Phishing campaigns are useful for training your employees against common techniques (if you’re on the blue side) or to get some cr3ds (if you’re on the red side).
This post is geared towards those on the blue side of things, but it can also be useful for red teamers and pentesters.
The techniques and tools I will show you allow you to create and run a simple phishing campaign using a customized domain to host the phishing website AND also send e-mails using your customized domain without the use of SMTP open relays (which can be illegal and/or dangerous) and without the need for you to create your own SMTP server (A lot of cloud services do not allow outbound SMTP traffic to discourage spammers).
Step 1 – Install GoPhish somewhere
GoPhish is an amazing tool for running Phishing campaigns. It easily enables you to create customized phishing e-mails and landing pages, and also allows you to define a list of targets and track them (Who opened the e-mails? Who clicked the link? Who submitted the data? Who reported it?)
We won’t be going over the installation process here because it is fully documented in other places and easy to understand. Here is a good tutorial:
https://docs.getgophish.com/user-guide/installation
Just create a VM on some cloud provider such as AWS, Azure or GCP and install GoPhish on it. Don’t forget to give the machine a public IP and allow ports 80, 443 and 3333 on the Firewall.
Step 2 – Register a Domain
If you want to have a phishing campaign that looks decent, you need a customized domain.
You can register it anywhere you want, and prices are usually pretty cheap. I recommend you to try NameCheap and Google Domains for most cases. For regional TLDs such as “.com.br”, you may have to use regional registrars, but these are pretty cheap too.
Common choices for phishing domains are:
- Typosquatted domains (change lowercase L’s for uppercase i’s, l ~= I, for example)
- Same domain but in a different TLD (legit.net VS legit.xyz)
- Random domain but with the original domain as a subdomain (legit.com VS legit.phishingdomain.com). This one works great because most users don’t understand the difference between a subdomain and a domain.
Step 3 – Prepare the SMTP Server
Your SMTP server (or service) is what’s going to send the nasty e-mails for you.
Here i suggest to you two approaches:
3.1 – Using Outlook (Extremely easy, but e-mails get sent as @outlook.com)
1 – Create an Outlook account with a name matching or similar to your domain
2 – Send a test e-mail to yourself, just so Outlook requires you to confirm that you’re a person. Fill the infos and try again.
3 – Go into Outlook settings and allow POP Access:
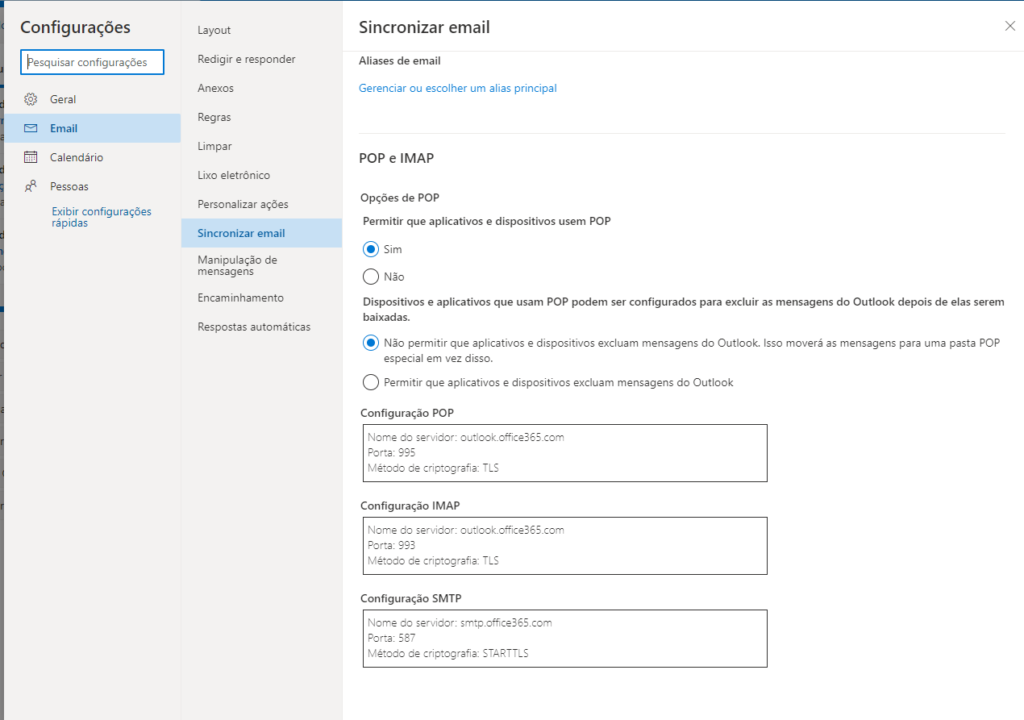
4 – That’s it!
3.2 – Using Zoho Mail (Easy and allows you to send e-mails from your domain, but expires after 15 days)
Zoho Mail is a mail service that has a free 15 days trial with no credit card required. You can use it to send phishing e-mails from your newly registered domain with almost no restrictions.
Go to https://www.zoho.com/mail/zohomail-pricing.html?src=zmail and click the “TRY NOW” button to get started with your trial.

You will need a valid cellphone number and add some TXT and SPF entries on your domain’s DNS provider to prove you own the domain and allow Zoho to send e-mails on your behalf.
The TXT record is generated specifically for your account. The required SPF records can be found here:
https://www.zoho.com/mail/help/adminconsole/spf-configuration.html
Go through the initial setup and make sure your e-mail is working. If not, check your SPF records!
Step 4 – Configure the sending profile on GoPhish
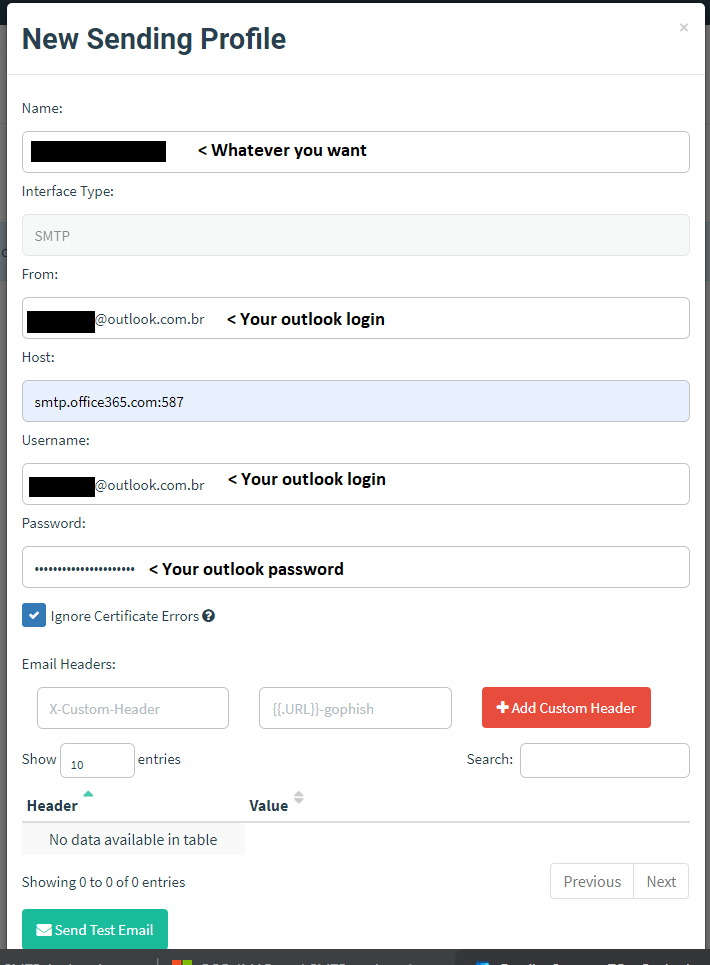
If you used Outlook, you must create a sending profile on GoPhish like this:
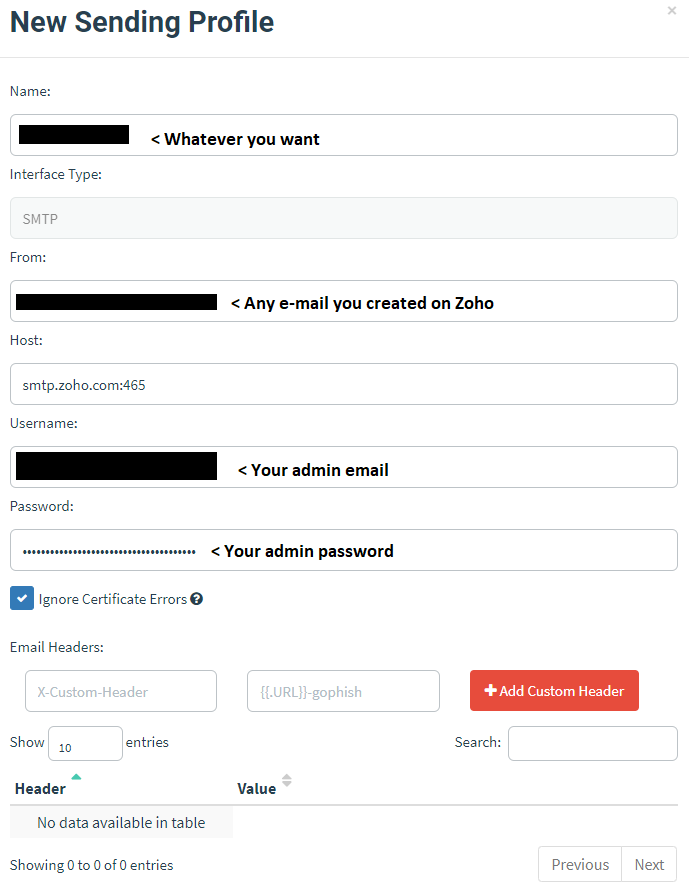
If you used Zoho, your sending profile must be like this:
Send a test e-mail to yourself! Outlook is really fickle and may require additional confirmations that you’re not a robot before it lets you use its SMTP / POP service.
Step 5 – Configure your domain’s DNS A entry to point to your GoPhish public IP
This one is really simple, but it allows your victims to access your phishing page using your customized domain instead of the raw IP (which is much more suspicious).
Check with your registrar to see how you can create (or modify) the DNS A entry for your domain (which is the one that maps your domain to an IPV4 address).
Step 6 – Configure your targets group, your e-mail template and your landing page on GoPhish
These are all required to finally launch your campaign on GoPhish. You can find more info here.
The “user group” is the list of users that will receive the phishing e-mail. The “email template” is the e-mail that they will receive and the “Landing page” is simply the phishing page itself.
https://docs.getgophish.com/user-guide/documentation/groups
https://docs.getgophish.com/user-guide/building-your-first-campaign/creating-the-template
https://docs.getgophish.com/user-guide/documentation/landing-pages
Here are a few important tips and notes that are not stated in the documentation:
For e-mails:
- When creating the e-mail template, don’t forget to use a tracker to see which users opened the e-mail
- You can use tags such as {{.Email}} or {{.FirstName}} to dinamically modify the e-mail for each user, making it look much more realistic.
- Remember that HTML links can differ between the text displayed and the real link. Be tricky!
For landing pages:
- I highly recommend you to import an existing webpage using GoPhish, go to the “raw” section, copy the HTML file to your computer and edit it on your own computer. When it’s finished, grab the raw HTML and copy it back into GoPhish. This method is much easier and makes sure you won’t lose your work.
- The page must have a “form” HTML element with a type=”submit” button, because that is how GoPhish detects and stores the sent data.
- GoPhish (afaik) doesn’t support phishing pages with multiple “steps” or pages. Everything must be in a single page.
Step 7 – Launch the campaign!
On GoPhish, create a campaign using your targets list, an e-mail template and a landing page. Set the start and end date (e-mails will be sent evenly between the total time of the campaign) and launch.
Grab a beer, sit back and enjoy B)
Additional thoughts, tips and insights
- If you use this tutorial for malicious purposes, fuck you.
- For a given set of users, expect anywhere between 5-20% of them to actually submit credentials, depending on how good your phish is and how bad their training is. Same goes for report rates.
- Do not forget to shut down the machine containing GoPhish after the test.
- If you’re doing another test on the same machine, try to change the public IP and create a new domain to avoid blacklists.
- If you want to, whitelist the sending domain to bypass your own SPAM/phishing filters. Your choice depends on what kind of test you want: More realistic, or more “let’s train users” like?
Views: 167